Writing your first Fastview app, part 1
Install Fastview
Install using pip:
pip install django-fastview
Add to settings.INSTALLED_APPS:
INSTALLED_APPS = [
    ...
    "fastview",
    "polls.apps.PollsConfig",
]
We’ll also use the default CSS and JavaScript in our project, so lets add them to our site’s base template:
<head>
    ...
    <link rel="stylesheet" href="{% static "fastview/index.css" %}">
    <script src="{% static "fastview/index.js" %}" async></script>
{% block extrahead %}{% endblock %}
</head>
Set up a ViewGroup
Fastview uses ViewGroups to tie together a collection of related views. Usually you will want the ModelViewGroup class, which adds views to operate on a single model.
Lets add one to our views (leave everything else there for now):
from fastview.viewgroups import ModelViewGroup
from .models import Question


class PollViewGroup(ModelViewGroup):
    model = Question
Now we need to put it at an accessible URL. Because a ViewGroup manages multiple views
and urls, it has an include method which generates its own URLconf. This takes the
same arguments as the regular include function.
Because we want to put our views at /polls/, we’ll add it directly to our top-level
urls in mysite.urls.
Remove the existing line with include("polls.urls") and replace it with a call to
PollViewGroup.include(..):
from django.contrib import admin
from django.urls import path
from django.views.generic import RedirectView

from polls.views import PollViewGroup


urlpatterns = [
    path("polls/", PollViewGroup().include(namespace="polls")),
    path("admin/", admin.site.urls),
    path("", RedirectView.as_view(pattern_name="polls:index", permanent=False)),
]
And now we have a working ViewGroup, in the namespace polls, so the redirect to
polls:index will still work. Lets see what happens in the browser:

Two problems: we have no public-facing auth system, and we’re being denied access to the ViewGroup.
Make everything public
Lets fix access first. By default, ViewGroups deny access to all their views. This is by design - we want to make you think about who you’re giving access to which views.
That said, for now lets just make every view public:
from fastview import permissions


class PollViewGroup(ModelViewGroup):
    model = Question
    permission = permissions.Public()
Now try /polls/ again:
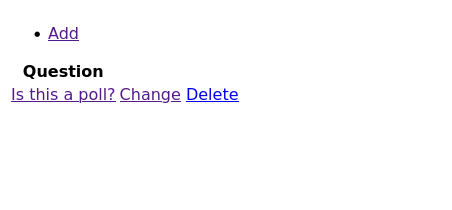
This is the index, using a ListView, and it links to the other views in the
ViewGroup. It’s not much to look at though, so lets customise the styles.
Add some style
First the action list. These are the list of links at the top of the page - at the moment our list view only has one link, but our detail view has four. Lets style them as a row of buttons:
Note
TODO: Move basic layout into fastview.css
/* Fastview action list */
ul.fastview-actions {
  margin: 0 0 1rem 0;
  padding: 0;
}

ul.fastview-actions li {
  display: inline-block;
}

ul.fastview-actions a {
  background: #5080c0;
  border-radius: 1rem;
  color: white;
  display: block;
  padding: 0.25rem 1rem;
  text-decoration: none;
}

ul.fastview-actions a:hover {
  background: #294970;
}
And we can style the list view table too:
/* Fastview list table */
table.fastview-list-table {
  width: 100%;
  border-spacing: 0;
}

table.fastview-list-table th,
table.fastview-list-table td {
  text-align: left;
  vertical-align: top;
  padding: 0.25rem 0.5rem;
}

table.fastview-list-table th {
  background: #5080c0;
  color: #fff;
}

table.fastview-list-table tr:nth-child(even) {
  background: #edf4fd;
  color: #fff;
}
Lets try the list view again:
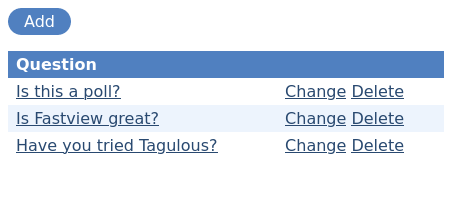
That’ll do for our poll index. We can now remove our old IndexView from
polls/views.py.
Fastview makes no assumptions about your design. If you write your own CSS these elements are easy to style, or if you prefer to use a CSS component framework like Bootstrap or Tailwind, the templates are designed to be easy to customise - each element is broken out into a separate sub-template, ready to be overridden or included in a different parent page structure. You’ll see how this works in the next part of the tutorial.
Now we’ve covered the basics, lets move on to part 2 of this tutorial to see how to start customising the views in our ViewGroup.